Landscape Lighting Ideas for Outdoor Entertaining in Coastal NC
Outdoor lighting planning guide for evening entertaining · 10-minute read
Good landscape lighting is the difference between a backyard you leave at sunset and one you stay in until midnight. That is the short answer. Most homeowners in Wilmington, Carolina Beach, and the surrounding coastal NC communities invest thousands of dollars in beautiful patios, outdoor kitchens, and fire features — then install a handful of solar stake lights from the hardware store and wonder why nobody uses the space after dark.
The reason is simple: a well-designed outdoor room needs intentional lighting the same way your living room does. You would never put a single overhead bulb in a room where you entertain guests, and the same principle applies outside. This guide walks through the lighting layers that actually work for outdoor entertaining in coastal North Carolina — what each layer does, where it goes, and why it matters more here than almost anywhere else in the state.
Why Lighting Matters More in Coastal NC
Wilmington averages sunset past 8:15 PM from May through August. The evenings are warm, breezes come off the Cape Fear River and the Intracoastal Waterway, and the humidity drops just enough after dark to make sitting outside genuinely more comfortable than sitting inside. That is a four-month window — roughly 120 evenings — where your outdoor space is at its most valuable.
But without thoughtful lighting, those evenings end when the last sliver of twilight fades. Guests trip on patio edges. The cook at the grill cannot see the thermometer. Nobody can find the path back to the house. The party moves indoors by 9 PM, and a patio that cost five or six figures sits empty in the dark.
Lighting solves this completely. The right system extends your usable outdoor hours by four or five per evening, which over a full coastal NC summer amounts to 500 additional hours of livable outdoor space. That is not a luxury — it is basic return on investment for the hardscape and structures you have already built.
The Four Layers of Outdoor Entertaining Light
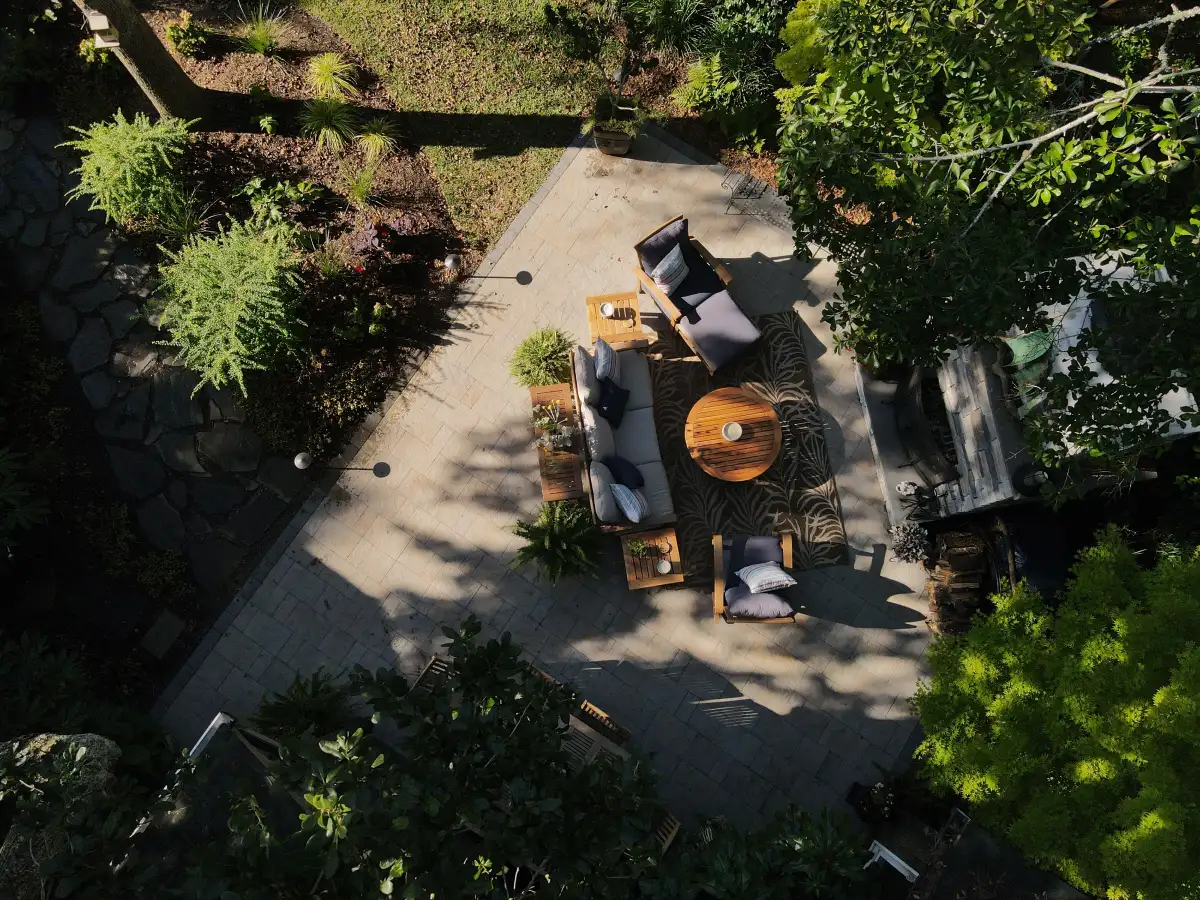
Professional landscape lighting design works in layers, just like interior design. Each layer serves a different purpose, and the combination creates depth, safety, and atmosphere that a single fixture type cannot achieve alone.
Layer 1: Task Lighting
Task lighting goes where people work. In an outdoor entertaining context, that means the outdoor kitchen — over the grill, across the prep counter, above the sink, and along the bar where guests are served. Task lighting should be bright enough to cook by (300-500 lux on the work surface) without flooding the entire backyard with harsh light.
Integrated under-counter LED strips, adjustable pendant-style fixtures over island counters, and recessed lights under pergola beams are the most effective task solutions. The key is to keep task lighting contained. You want a bright, functional cooking zone that does not wash out the softer ambience of the surrounding seating areas. Think of it like a restaurant kitchen — bright where the chef works, dim where the diners sit.
Layer 2: Path and Safety Lighting
Path lighting is the most practical layer and the one most often done wrong. Its job is to illuminate transitions — where the patio meets the lawn, where steps change elevation, where the walkway turns between the house and the outdoor room. Guests carrying drinks and plates need to see where they are stepping, especially on a paver patio with level changes or between a deck and a lower stone terrace.
Effective path lighting uses low-profile, downward-facing fixtures that cast pools of light on the walking surface without glaring into anyone's eyes. Spacing matters: fixtures placed too far apart create alternating bright spots and dark gaps that are worse than no lighting at all. A general rule is 6 to 8 feet apart on straight runs and a fixture at every turn or intersection. Step lights — small LED units recessed into the riser of each step — are non-negotiable on any patio, deck, or retaining wall with grade changes.
Layer 3: Accent and Feature Lighting
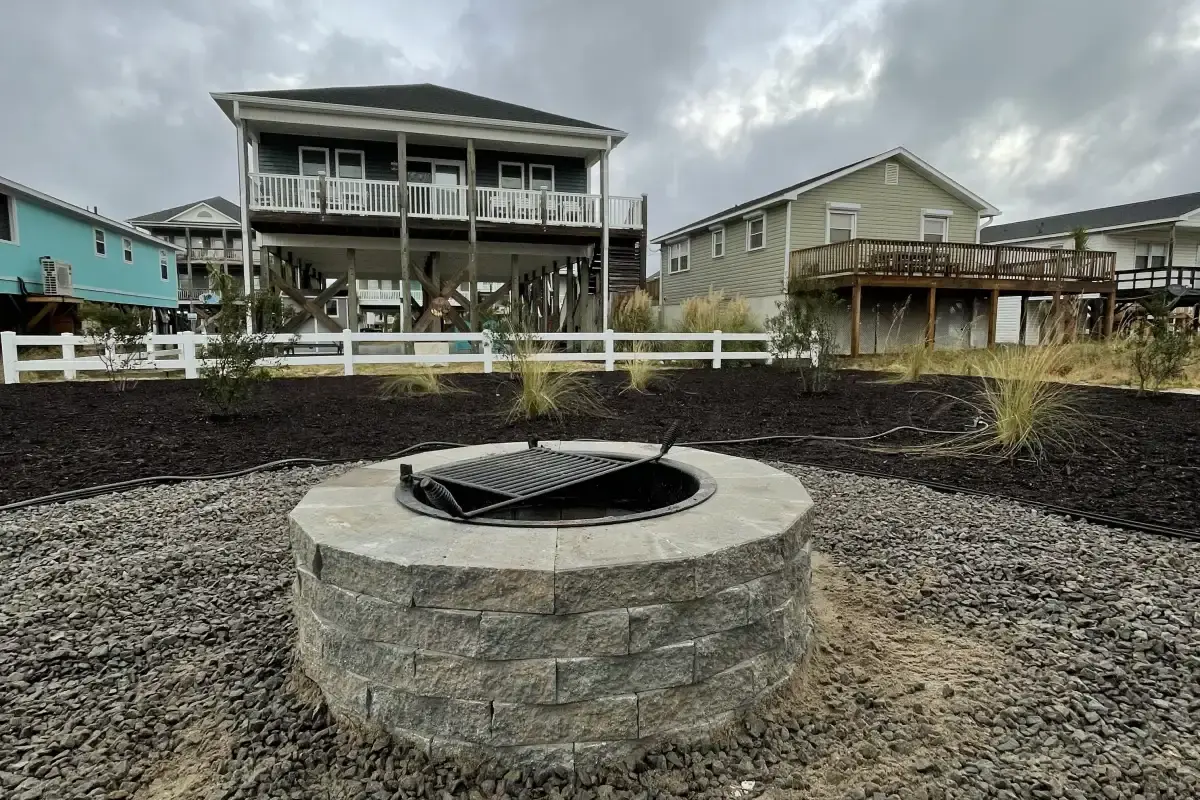
Accent lighting is what makes people say "this looks incredible" when they walk into your backyard. It highlights specific features — a specimen live oak uplit from three angles, a stone fireplace wall grazed by a light at a tight angle to reveal texture, or a water feature with submersible LEDs that make the surface glow after dark.
The most dramatic accent technique for coastal NC properties is moonlighting: fixtures mounted high in the canopy of mature trees, aimed downward through the branches to cast soft, dappled shadows on the ground below. The effect mimics natural moonlight and creates an atmosphere that no ground-level fixture can reproduce. Wilmington and Hampstead properties with mature live oaks, southern magnolias, or longleaf pines are especially well-suited for this technique.
Fire features benefit enormously from accent lighting, too. A custom fire pit or outdoor fireplace already provides its own flickering glow, but surrounding the fire zone with subtle backlighting on adjacent seat walls and plantings creates depth that makes the fire feel like a centerpiece rather than a campfire dropped in the middle of a dark yard.
Layer 4: Ambient and Decorative Lighting
Ambient lighting fills in the gaps between the other three layers. It provides general illumination at a low level — enough to see faces and navigate furniture, but not so much that the space feels like a parking lot. String lights under a pergola or pavilion, lanterns on dining tables, and softly glowing bollards at the perimeter of a seating zone all contribute to the ambient layer.
In a well-designed system, ambient lighting is what makes the space feel welcoming. It is the warm glow you notice from inside the house that makes you want to walk outside and join the conversation.
Color Temperature: The Detail That Changes Everything
Color temperature — measured in Kelvins — determines whether your lighting feels warm and inviting or cold and clinical. For outdoor entertaining in coastal North Carolina, the sweet spot is 2700K to 3000K. This range produces a warm white light that flatters skin tones, makes food look appetizing, and complements the natural amber glow of a fire pit.
Avoid anything above 4000K for entertaining zones. Fixtures rated at 5000K or higher produce a blue-white daylight-spectrum light that is excellent for security cameras and warehouse floors but feels sterile and uninviting in a backyard. The one exception is underwater lighting in a pool or water feature, where slightly cooler tones (3500K) can look striking against the blue water.
Consistency matters, too. If your path lights are 2700K, your uplighting is 4000K, and your task lights are 3000K, the backyard will feel disjointed — like three different rooms colliding. A professional lighting design uses a single color temperature across the entire system and varies intensity instead of color to create contrast.
Salt Air and Fixture Quality in Coastal NC
This is where coastal NC homeowners pay the highest price for cutting corners. Wilmington, Carolina Beach, Surf City, and Hampstead sit in a constant salt-air environment that destroys cheap landscape lighting fixtures within one to three years. Stamped aluminum housings corrode. Painted finishes blister and peel. Wire connections oxidize until the system starts flickering and dropping zones.
The solution is solid cast brass or solid copper fixtures. They cost more upfront — often two to three times what a big-box aluminum fixture costs — but they develop a natural patina over years without ever pitting, rusting, or failing structurally. A properly installed brass fixture rated for coastal conditions will still be working at year fifteen when the aluminum fixture from the hardware store has been in a landfill for a decade.
The same principle applies to wire connections. Silicone-filled, waterproof connectors prevent the corrosion that causes intermittent failures. Direct-burial low-voltage cable, sized for the actual run length of the circuit, prevents voltage drop that dims fixtures at the far end of long runs. These details are invisible once the system is installed, but they are the difference between a lighting system that performs for fifteen years and one that starts failing at year three.
Designing Lighting Around How You Actually Entertain
The best lighting plans start with a question: how do you use the space? A family that grills three times a week and eats at an outdoor table needs different lighting than a couple who hosts wine-and-fire-pit evenings for eight guests every Saturday. The fixtures may even be identical — the placement, intensity, and zone control are what change.
For cooking-centric entertaining, invest heavily in task lighting over the kitchen and dining zone. A well-lit grill station with a dimmable pendant over the bar counter lets the host cook and serve without squinting, while guests sit comfortably in the softer ambient glow of the dining area a few feet away.
For fire-and-conversation evenings, accent lighting takes priority. Uplight the trees, graze the fireplace stone, backlight the seat walls, and keep the general illumination low. The fire becomes the primary light source, and the accent lighting provides just enough fill to see faces and navigate without killing the atmosphere.
For large parties and events, the answer is zone control. A smart transformer with programmable scenes lets you run the full system at 100 percent for a cocktail hour, dim everything by 40 percent for dinner, and drop to accent-and-fire-only for the rest of the evening — all from your phone.
See Your Lighting in 3D Before Installation
One of the hardest things about landscape lighting is that you cannot see the result until after it is installed. You are making decisions about fixture placement, beam angles, and intensity levels based on diagrams and specifications — then waiting until the system is wired and turned on at dusk to see whether it actually works.
Our 3D design process eliminates that uncertainty. We render your entire property — hardscape, plantings, structures, and lighting fixtures — in a digital twin that shows the nighttime effect before a single wire is buried. You can see exactly how the uplighting will hit your live oak canopy, where path lights will pool on the walkway, and whether the task lighting over the outdoor kitchen provides enough coverage for the prep area. If something does not look right, we adjust it in the render — not after the fixtures are in the ground.
Common Mistakes Homeowners Make With Outdoor Lighting
- Too few fixtures, too far apart: Under-lighting a space creates dark pools that feel unsafe and unwelcoming. More fixtures at lower intensity always looks better than fewer fixtures cranked to maximum brightness.
- Wrong color temperature: Mixing warm and cool fixtures, or going too cool (above 4000K), makes the space feel clinical instead of inviting.
- Solar-only systems: Solar stake lights produce inconsistent, dim light that fails entirely on cloudy days and cannot be controlled. They are not a substitute for a hard-wired low-voltage system.
- Ignoring the view from inside: Stand at your kitchen window or back door and look at the lighting from inside the house. If all you see is glare from unshielded fixtures, the design needs adjustment.
- Forgetting maintenance: Even premium systems need annual inspection — cleaning lenses, checking connections, adjusting fixtures displaced by landscaping changes, and trimming plantings that have grown to block fixtures.
- No dimming or zone control: A single on/off switch for the entire system means you cannot adapt the lighting to different situations. Invest in a smart transformer with at least three independently controllable zones.
Getting Started With a Lighting Plan
If you have an existing outdoor living space that goes dark after sunset — or you are planning a new build and want lighting designed into the project from the start — the process begins with a property walk at dusk. We evaluate existing ambient light, identify features worth highlighting, understand how you use the space after dark, and then build a complete lighting plan into the 3D render of your project.
Late spring is the ideal time to start this conversation. Fixture availability, transformer lead times, and installation scheduling all tighten as summer demand increases across Wilmington, Smithfield, Carolina Beach, Surf City, Hampstead, Wallace, and Leland. Homeowners who lock in a design in May are entertaining under finished lighting by June. Homeowners who wait until July are often looking at an August or September installation — missing the best part of the season.
Book your Visionary Consultation or call us at (919) 634-2359. You can also browse our completed project portfolio to see how lighting transforms our outdoor living installations across coastal North Carolina.